
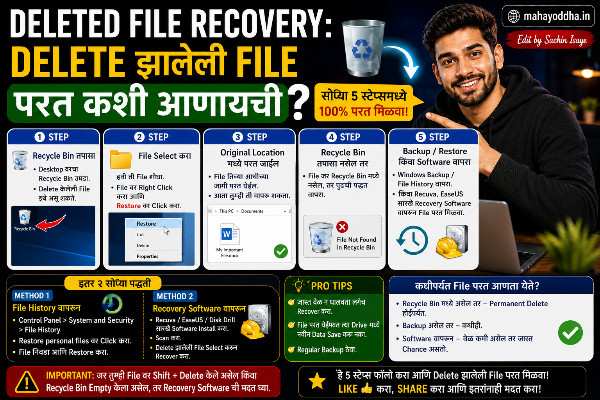
Delete झालेली File परत कशी आणायची — Ctrl + Z पासून Advanced Recovery पर्यंत
तीन महिन्यांपूर्वी एक panic situation झाली. Deleted File Recovery.
Project folder accidentally delete केला. Recycle Bin मध्ये पण नव्हता — Shift + Delete केलं होतं. तीन आठवड्यांचं काम.
पुढचा एक तास file recovery साठी गेला. शेवटी Windows File History मधून recovered झाल्या. सगळ्या नाही — पण बहुतेक.
त्या दिवशी file recovery बद्दल seriously शिकलो. आज Mahayoddha.in वर हे properly explain करतो — situations नुसार कोणती method वापरायची.
Method एक — Ctrl + Z (सगळ्यात आधी Try करा)
File delete केली, Rename चुकीचं झालं, File चुकीच्या folder मध्ये गेली — लगेच Ctrl + Z.
हे काम करतं जेव्हा:
File delete केल्यावर लगेच — दुसरं काहीच केलं नाही तेव्हा. File Explorer मध्ये Ctrl + Z काम करतो. Same session मध्ये, PC restart नाही केलेलं.
काम करत नाही जेव्हा:
Shift + Delete ने permanent delete केलं असेल. PC restart झाला असेल. बऱ्याच operations नंतर try करत असाल — Undo history overwritten असते.
Ctrl + Z repeatedly press करता येतो — multiple undos. चुकून जास्त undo झालं तर Ctrl + Y ने redo.
Method दोन — Recycle Bin
Normal Delete ने file Recycle Bin मध्ये जाते — permanently delete नाही होत. Recycle Bin उघडा, file शोधा, right-click, Restore.
Keyboard ने Recycle Bin:
Win + D — Desktop. Tab ने Recycle Bin navigate करा, Enter ने उघडा.
Search in Recycle Bin:
Recycle Bin उघडल्यावर Ctrl + F — search करा file नावाने.
Recycle Bin full असेल तर:
Recycle Bin ला size limit आहे. Full झाला तर जुन्या files automatically permanently delete होतात. Recycle Bin properties मध्ये size वाढवता येतो — right-click on Recycle Bin, Properties.
Shift + Delete केलं असेल तर:
Recycle Bin मध्ये जात नाही — directly permanent delete. पुढच्या methods लागतात.
Method तीन — File History
Windows मध्ये File History feature आहे — enabled असेल तर files च्या previous versions automatically save होतात.
File History enabled आहे का check करा:
Settings → System → Storage → Advanced storage settings → Backup options. किंवा Control Panel → File History.
Previous version restore कसं:
File असलेल्या folder मध्ये जा. Empty जागी right-click — “Restore previous versions.” Window येतो — available versions दिसतात date नुसार. Version select करा, Restore.
माझ्या deleted project folder चं हेच झालं — File History enabled होतं, तीन दिवस जुनी version restore झाली.
File History Enable करा — आत्ता:
External drive किंवा network drive connect करा. Control Panel → File History → Turn on. हे setup केलं की automatically backup होत राहतो.
Method चार — Previous Versions (Shadow Copy)
Windows automatically System Restore points बनवतो — त्यात file snapshots असतात.
कसं access करायचं:
File किंवा folder होतं त्या location ला जा. Folder वर right-click — Properties — Previous Versions tab. Available versions दिसतात. Select करा, Restore.
Folder delete झाला असेल तर:
Parent folder वर right-click — Previous Versions — folder होतं त्या version ला जा.
हे नेहमी available नसतं — System Restore points असतील तर. Windows Update, driver installation नंतर automatically बनतात.
Method पाच — Windows Backup
Windows Backup (Backup and Restore Windows 7) — Control Panel मध्ये आहे.
Backup setup असेल तर:
Control Panel → Backup and Restore → Restore my files. Date नुसार backup version select करा, specific files browse करा, restore करा.
Setup नसेल तर:
पुढच्या वेळी करा. External hard drive connect करा, automated backup schedule करा — weekly किंवा daily.
Method सहा — Third-Party Recovery Software
Shift + Delete केलं, Recycle Bin नाही, File History नाही — तरी file recover होण्याची शक्यता आहे.
जेव्हा file delete होते तेव्हा disk वरचा data immediately erase नाही होत — फक्त “available space” म्हणून mark होतो. नवीन file त्या space वर write होईपर्यंत original data असतो.
म्हणूनच — Delete केल्यावर PC जास्त वापरू नका. प्रत्येक write operation recovery chance कमी करतो.
Free Recovery Tools:
Recuva — Piriform कंपनीचं, free, user friendly. File type नुसार filter करता येतो — photos, documents, videos. Deep scan mode मध्ये जास्त files सापडतात.
Windows File Recovery — Microsoft चं official command-line tool. Store मधून free download. Advanced users साठी.
TestDisk — Open source, more powerful, technical आहे.
Recovery Process:
Recovery software install करा. Target drive स्कॅन करण्याआधी software different drive वर install करा — delete झालेल्या drive वर नाही. Scan करा, file शोधा, different location ला restore करा.
Prevention — हे Setup केलं तर Future मध्ये Panic नाही
File History Enable करा
Settings → System → Storage → Advanced → Backup options → Add a drive. External drive select करा. “Automatically back up my files” ON करा. Frequency set करा — hourly, daily.
OneDrive किंवा Google Drive Sync
Important folders OneDrive किंवा Google Drive मध्ये sync करा. Cloud मध्ये automatically backup. Version history असतो — previous versions restore करता येतात.
OneDrive मध्ये deleted files 30 दिवस OneDrive Recycle Bin मध्ये असतात.
Recycle Bin Size वाढवा
Recycle Bin right-click → Properties. Maximum size वाढवा — 10-20 GB. Important files accidentally permanently delete होण्याची शक्यता कमी होते.
Shift + Delete Carefully
Shift + Delete permanent delete आहे — Recycle Bin bypass होतो. हे shortcut consciously वापरा — unnecessary files साठी. Important files साठी normal Delete वापरा.
Recovery Scenarios — कोणती Method कधी
| Situation | First Try | Backup Option |
|---|---|---|
| लगेच delete झाली | Ctrl + Z | Recycle Bin |
| थोड्या वेळाने लक्षात आलं | Recycle Bin | Previous Versions |
| Shift + Delete झालं | File History | Recovery Software |
| Folder delete झाला | Previous Versions | File History |
| PC restart झाला नंतर | File History | Recovery Software |
| बरेच दिवसांनंतर | Recovery Software | OneDrive/Cloud History |
FAQ
Q. Recuva ने scan केलं, file सापडली — restore केली पण open होत नाही. का?
File data partially overwritten झाला असेल. नवीन data त्या disk space वर write झाल्याने original file corrupt आहे. Recovery chance delete झाल्यानंतर जेवढ्या लवकर try कराल तेवढा जास्त असतो. Corrupt file repair साठी file-type specific repair tools आहेत — photo repair, document repair.
Q. SSD वर delete झालेली file recover होते का?
SSD TRIM feature वापरतो — deleted space immediately clear होतो. HDD पेक्षा SSD वर recovery significantly कठीण आहे. File History आणि Cloud backup SSD users साठी जास्त important आहे. Delete झाल्यावर SSD वर recovery chance खूप कमी असतो.
Q. WhatsApp photos delete झाल्या — recover होतात का?
Android मध्ये WhatsApp photos DCIM किंवा WhatsApp/Media folder मध्ये असतात. Recuva Android phone वर direct काम नाही करत — phone storage वेगळं आहे. Google Photos backup enabled असेल तर तिथून restore होतात. WhatsApp cloud backup असेल — WhatsApp settings → Chats → Chat backup — तर reinstall करून restore होतं.
Q. File History साठी external drive नाही, alternative आहे का?
Network drive वापरता येतो — router connected NAS. OneDrive Files On-Demand — important folders sync करा, automatic versioning आहे. Google Drive — Backup and Sync tool important folders continuously backup करतो. Cloud storage हे external drive ला practical alternative आहे.
Q. Corporate laptop मध्ये IT ने delete केलेल्या files recover होतात का?
Corporate environment मध्ये IT administrators file recovery tools वापरतात. User level recovery attempt IT policies violate करू शकतो. IT department ला contact करा — त्यांच्याकडे enterprise backup solutions असतात जे individual users ला access नसतात.
Conclusion
त्या दिवशी project folder recover झाला — File History मुळे. त्यानंतर OneDrive sync setup केलं, File History properly configure केलं.
File loss होणं genuinely stressful आहे. पण right methods माहीत असतील तर recovery possible आहे बऱ्याच situations मध्ये.
सगळ्यात important goshta — delete झाल्यावर लगेच PC जास्त वापरू नका. प्रत्येक write operation recovery chance कमी करतो.
आणि prevention — File History किंवा Cloud backup आत्ता setup करा. Future मध्ये panic नाही.
तुमची कधी important file delete झाली आहे का? कशी recover केली? Comment मध्ये सांगा — इतरांना useful होईल.

Sachin Isaye
सचिन इसाये
नमस्कार! मी सचिन इसाये, Founder of Mahayoddha.in. २०१७ पासूनच्या माझ्या Blogging आणि Digital Content क्षेत्रातील अनुभवाचा वापर करून, मी Keyboard, Typing Speed, Windows Shortcuts आणि Digital Skills यांसारख्या विषयांवर सोप्या मराठीत practical माहिती देण्याचा प्रयत्न करतो.
Keyboard Buying Guide, Mechanical Keyboard, Wireless Keyboard, Keyboard Problems, Keyboard Typing Skills आणि Keyboard Ergonomics यांसारखे विषय सामान्य मराठी वाचकांना सहज समजावून सांगणे, हेच माझे काम आहे.
विद्यार्थी, Bloggers, Content Writers, Office Users, Work From Home करणारे आणि नवीन computer users यांना keyboard वापरून आपलं काम जलद, सोपं आणि smart करता यावं, हेच माझं ध्येय आहे. नवीन Keyboard Guides, Typing Tips आणि Windows Shortcuts साठी Mahayoddha.in ला नियमित भेट द्या.