
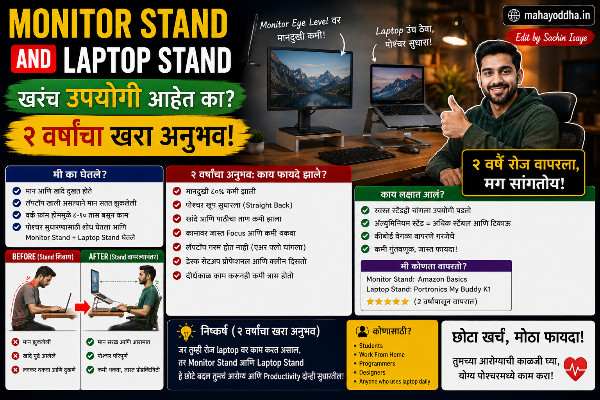
Monitor Stand And Laptop Stand — दोन्ही घेतले, दोन वर्षांनंतर काय वाटतं ते सांगतो
दोन वर्षांपूर्वी Mahayoddha.in साठी writing setup seriously upgrade करायचं ठरवलं.
त्या वेळी laptop directly table वर होता. Screen खाली होती. मान दुखत होती — Neck-Shoulder Pain article मध्ये हे experience share केलं आहे. Doctor ने screen height fix करायला सांगितलं.
Research केलं. Laptop stand घेतला — ₹९५०. External keyboard आधीच होता.
सहा महिन्यांनंतर external monitor add केला. Monitor arm घेतला — ₹२,२००.
दोन्ही experience आहेत. आज Mahayoddha.in वर honest comparison करतो — कोणाला काय गरजेचं आहे.
Screen Height का इतकं Important आहे — एकदा समजलं की पुन्हा ignore नाही करणार
Laptop table वर ठेवल्यावर screen साधारण तीस ते पस्तीस cm उंचीवर असते. Eyes साधारण एकशे दहा ते एकशे वीस cm उंचीवर. Gap — ऐंशी cm.
म्हणजे सतत खाली बघणं. मान पुढे आणि खाली.
Mahayoddha.in च्या Neck Pain article मध्ये हे explain केलं आहे — head neutral position मध्ये पाच ते सहा kg. Three inches forward झाली की सत्तावीस kg effective load. हे घंटो झालं की cervical strain होतो.
Screen eye level ला आणलं की head neutral position मध्ये राहतो. Neck muscles unnecessarily work करत नाहीत.

Laptop Stand — माझा Experience
कोणता घेतला आणि का
Z-shape aluminium adjustable stand घेतला — ₹९५०. Height सात ते पंधरा cm adjust होते. Ventilation holes आहेत. Anti-slip pads आहेत.
पहिल्या दिवशी stand लावला — laptop eye level ला आला. External keyboard connect केला. Typing सुरू केली.
फरक लगेच जाणवला. मान खाली वाकवायची गरज नव्हती. तास-दोन तास काम केल्यावर neck strain नव्हती — जे पूर्वी consistently होत होतं.
Types आणि कोणाला काय Suitable
Portable/Foldable Stand — ₹३०० ते ₹७००. Lightweight, compact. Travel मध्ये carry करायला. Adjustability limited असते. Material plastic असेल तर stability कमी. Frequent traveler साठी.
Z-Shape Adjustable — ₹५०० ते ₹१,५००. Most popular. Height adjust होते. Aluminium options आहेत. Daily desk use साठी best value.
Cooling Pad Stand — ₹८०० ते ₹२,०००. Fan integrated असतो. Laptop temperature कमी ठेवतो. Gaming किंवा video editing — processor intensive work — साठी useful. Fan noise येतो — quiet environment मध्ये annoying.
Premium Adjustable — ₹१,५०० ते ₹४,०००. Multiple height levels, angle adjustment. Build quality superior. Heavy laptop साठी stable.
काय बघायचं खरेदी करताना
Material — Aluminium पसंत करा. Heat dissipation चांगलं, sturdy, long lasting. Plastic stands wobble होतात, time नंतर weaken होतात.
Weight capacity — तुमच्या laptop पेक्षा जास्त capacity असावी. Heavy gaming laptops ला strong stand लागतो.
Anti-slip surface — laptop slide होणार नाही. Top surface आणि bottom rubber pads दोन्ही important.
Ventilation — Stand ने laptop चा bottom airflow block होऊ नये. Gaps किंवा holes असाव्यात.
Height range — Eye level ला यायला sufficient height असावी. Short लोकांना जास्त height लागेल, tall लोकांना कमी. Adjustable stands versatile आहेत.
एक Important Note — Stand वर laptop असेल तर built-in keyboard खाली आहे — uncomfortable typing होते. External keyboard mandatory आहे. Mahayoddha.in च्या keyboard articles मध्ये options cover केले आहेत.
Monitor Stand आणि Monitor Arm — काय फरक आहे
Desktop setup असेल किंवा external monitor laptop सोबत वापरत असाल तर हे relevant आहे.
Monitor Stand — Simple आणि Stable
Desktop monitors सोबत stand येतो. पण factory stand usually height adjustment limited असतो — काही models मध्ये अजिबात नाही.
Desk Riser — लाकडी किंवा metal shelf. Monitor त्यावर ठेवतो. Simple, stable, inexpensive. ₹५०० ते ₹१,५००. Height fixed असतो — तुमच्या eye level नुसार सुयोग्य असेल तर ठीक, नाही तर problem.
Adjustable Monitor Stand — Height, sometimes tilt adjust होतो. ₹१,५०० ते ₩३,०००. Better than desk riser. पण desk space घेतो.
Monitor Arm — Pro Setup
हे gas spring mechanism वापरतो — एका बोटाने monitor move होतो. Height, tilt, swivel, rotation — सगळं adjust होतं.
Desk वर clamp होतो — desk surface free होतो. Monitor floating सारखा दिसतो.
माझा experience — Monitor arm लावल्यावर desk genuinely clean दिसायला लागला. Monitor exact eye level ला set केला. Tilt fine-tuned केला. Presentation देताना monitor rotate करता येतो.
VESA Compatibility — Monitor arm ला monitor च्या मागे VESA holes लागतात — standard pattern ७५mm x ७५mm किंवा १००mm x १००mm. खरेदी करण्याआधी monitor च्या back check करा.
Load Capacity — Monitor arm ला weight capacity असते. Monitor चं weight spec sheet मध्ये असतं — arm त्यापेक्षा जास्त capacity असावा.
Dual Monitor Setup — Productivity साठी
Dual monitor setup serious productivity boost देतो — Mahayoddha.in च्या multitasking article मध्ये mention आहे.
Primary monitor — main work. Secondary monitor — reference, communication. Alt+Tab significantly कमी होतं.
Dual monitor arm मिळतात — एकाच clamp ने दोन monitors. ₹३,५०० ते ₩६,०००. Space efficient.
Budget Options — किती खर्च करायचा
हे investment म्हणून बघा — neck pain, doctor visits, physiotherapy — हे expensive असतं. Prevention स्वस्त आहे.
| Product | Budget | Mid-Range | Premium |
|---|---|---|---|
| Laptop Stand | ₹३००-५०० | ₹७०० – ₹१,२०० | ₹१,५०० + |
| Monitor Riser | ₹४०० – ८०० | ₹१,०००- ₹१,५०० | ₹२,००० + |
| Monitor Arm | ₹१,५०० – २,००० | ₹२,५०० – ₹३,५०० | ₹५,००० + |
| Dual Monitor Arm | ₹३,००० – ४,००० | ₹५,000 – ₹७,000 | ₹१०,०००+ |
Budget options काम करतात — but build quality कमी असते. Mid-range sweet spot आहे. Premium options professional setups साठी.
FAQ
Q. Laptop stand वर laptop ठेवला, built-in keyboard वापरतो — चालेल का?
Technically चालेल पण ergonomically wrong आहे. Stand वर laptop असेल तर keyboard खाली आहे — wrist extension होतो. External keyboard लावाच. ₹१,५०० मध्ये decent external keyboard मिळतो — Mahayoddha.in वर budget keyboard guides आहेत.
Q. Glass top desk आहे — monitor arm clamp लावता येईल का?
Standard C-clamp glass desk वर works — पण glass thickness check करा, protective pad वापरा. काही arms grommet mount option देतात — desk मध्ये hole असेल तर. Glass desk साठी specifically designed mounts available आहेत. Manufacturer specifications check करा.
Q. Monitor arm लावण्यासाठी technical knowledge लागतो का?
नाही. Basic assembly आहे. Clamp desk ला लावा, arm attach करा, monitor VESA bracket ला mount करा. Instructions येतात. YouTube tutorials available आहेत specific product साठी. ३०-४५ minutes लागतात.
Q. Laptop stand laptop heat वाढवतो का?
Good stand ventilation improve करतो — laptop खाली airflow मिळतो जे table वर ठेवल्यावर block होतो. Aluminium stand heat dissipation मध्ये help करतो. Cooling pad stand actively cool करतो. Cheap plastic stand ventilation block करू शकतो — holes असलेला stand घ्या.
Q. दोन्ही laptop आणि external monitor एकत्र वापरतो — काय करायचं?
Laptop stand + monitor arm दोन्ही. Laptop eye level ला stand वर — secondary screen म्हणून. External monitor arm वर — primary screen म्हणून. दोन्ही eye level ला. External keyboard + mouse. हे setup genuinely impressive productivity देतो.
Conclusion
Laptop stand — ₹९५० — माझ्या setup मधला सगळ्यात impactful investment होता. Screen eye level ला आली, neck pain बंद झाला.
Monitor arm नंतर आला — desk cleaner झाला, monitor exact position ला set झाला.
Mahayoddha.in वर ergonomics series मध्ये हे practical hardware guide आहे. Screen height fix करणं हे free exercises आणि habits changes च्या बरोबर critical आहे — hardware support नसेल तर habits sustain होत नाहीत.
तुमचा current setup काय आहे — laptop stand आहे का? Screen eye level ला आहे का? Comment मध्ये सांगा.

Sachin Isaye
सचिन इसाये
नमस्कार! मी सचिन इसाये, Founder of Mahayoddha.in. २०१७ पासूनच्या माझ्या Blogging आणि Digital Content क्षेत्रातील अनुभवाचा वापर करून, मी Keyboard, Typing Speed, Windows Shortcuts आणि Digital Skills यांसारख्या विषयांवर सोप्या मराठीत practical माहिती देण्याचा प्रयत्न करतो.
Keyboard Buying Guide, Mechanical Keyboard, Wireless Keyboard, Keyboard Problems, Keyboard Typing Skills आणि Keyboard Ergonomics यांसारखे विषय सामान्य मराठी वाचकांना सहज समजावून सांगणे, हेच माझे काम आहे.
विद्यार्थी, Bloggers, Content Writers, Office Users, Work From Home करणारे आणि नवीन computer users यांना keyboard वापरून आपलं काम जलद, सोपं आणि smart करता यावं, हेच माझं ध्येय आहे. नवीन Keyboard Guides, Typing Tips आणि Windows Shortcuts साठी Mahayoddha.in ला नियमित भेट द्या.